EK-KIT H30 - Supreme HF 240 CU
By: Dan Durland
Introduction
In early February I upgraded my computer with a new i7 2600K cpu, and 5GHz became an everyday reality. Fast forward to July and the unrelenting heat wave seems to be winning the battle in my hi-speed computing endeavors. For the last 4 or 5 months my Noctua NH-D14 worked quite satisfactorily at keeping my temperatures in the mid 70C range under full load. July brings a different result; with my AC unit working as hard as it can my temperatures are still breaking the 80C barrier with an ever-increasing frequency. So what's a diehard overclocker to do? I searched for a better heatsink but I found none. It was at this time that I started looking for a watercooling alternative.
A few years ago, if watercooling was mentioned, Corsair would not have been brought up. In todays market that has all changed; Corsair is now one of the first brands mentioned, and it was the first place I looked. Having previously reviewed the Corsair H70 I knew it was in the same class as my present cooling solution so I ruled it out. However, Corsair does have a couple of new products out that I wanted to look into, the H80 and the H100. The H80 appears to be a new version of the H70 with a few software programmable features built in. While I'm confident the H80 is an excellent product I just don't think it will deliver the performance I desire. The H100 on the other hand does look like a real contender, but I just could not find any specific technical data for it. While I'm sure my case has numerous locations to mount the radiator, I'm not convinced the tubing is long enough to utilize my preferred choice. In fact I think the biggest problem facing the H100 is case incompatibility issues.
The next manufacturer I looked at was Swiftech and I was quite interested in the H20-220 EDGE Series Liquid Cooling Kit as it could be installed outside of the case. Like the Corsair H100, the H20-220 EDGE is a completely assembled product that only needs to be bolted to a case and the waterblock attached to the CPU. Unlike the H100, the H20-220 can be upgraded or repaired with newer parts. However it's expensive (approx. $300) and I just don't like the location of the pump and reservoir. The pump and the reservoir locations should be swapped so that the reservoir and the radiator inlets are both located at the top of the unit. I say this because most modern cases have waterline access holes built-in above the I/O panel and pci slots. And the reservoir should be located at the highest point to act as a fill-port.
After seeing the basic design of the Swiftech H20-220 EDGE I started looking at the available kits that would allow me to copy its basic configuration. Because the radiator and pump are located outside of the case, it is effectively removing all of the dissipated heat from the confines of the case. After hours of online store browsing I finally decided upon the EK-KIT H30 - Supreme HF 240 CU with a price of $240.95. I also bought a Swiftech MCB-120 Radbox ($19.95) as a mounting device, (2) sets of PrimoChill Anti-Kink Coils ($3.95 ea.) and a IandH Silver KillCoils Antimicrobial ($6.99). The total price for all of this, $275.79 + shipping.
Specifications
EKWB said:The EK-KIT H3O - Supreme HF 240 Cu water cooling kit is an advanced kit dedicated to all users that seek simple, yet quality and efficient all in one solution.
Supreme HF block is best and most efficient CPU block (confirmed by independent reviews) and offers supreme thermal conductive performance and highest water flow.
EK-CoolStream RAD XT (240) radiator will fit in majority of watercooling cases and will successfully take heat out of your system (please check template of rad prior to installing in case).
EK-DCP 4.0 pump has been also proven for some time now by water cooling community and allows adequate and optimal flow for your kit.
- EK-Supreme HF - retail price $72.95
- EK-CoolStream RAD XT (240) - retail price $59.95
- (2) Yate-Loon D12SH-12 (2200 rpm) - retail price $6.95 ea.
- EK-DCP 4.0 Pump - retail price $59.95
- EK-Multioption RES X2 - 150 Basic - retail price $39.95
- EK-DCP Pump mounting plate KIT - retail price $7.95
- TUBE Masterkleer 12.7/9.5 CLEAR (2 meters) - retail price $9.95
- (8) EK-PSC Fittings 10mm-G1/4 Nickel - retail price $4.99 ea.
- EK-Ekoolant UV Blue (concentrate 100ml) - retail price $5.00 (approx.)
- TIM Arctic Cooling MX-2 (2gm) - retail price $5.00 (approx.)
- Water cooling KIT Installation Manuals beta 2
All of these components purchased individually totals approx. $314.52, the kit cost me $240.95 for a savings of $73.57.
Image Gallery
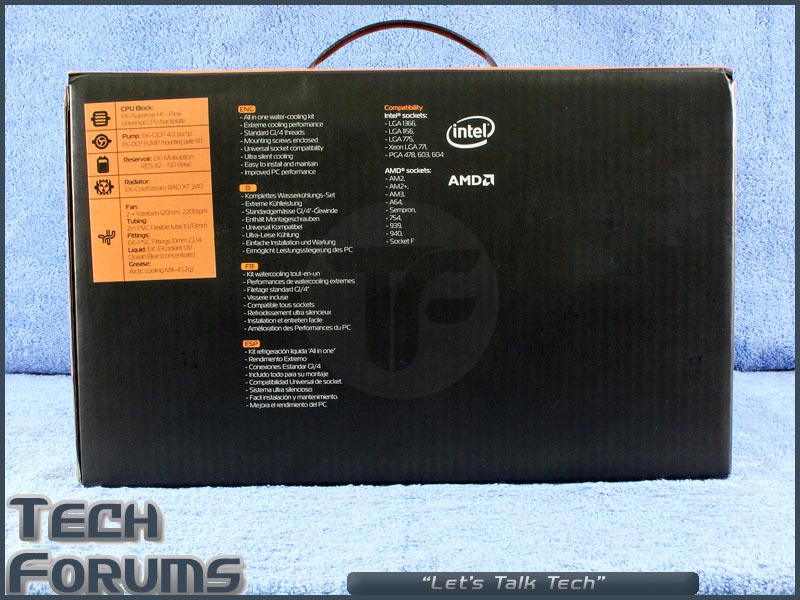
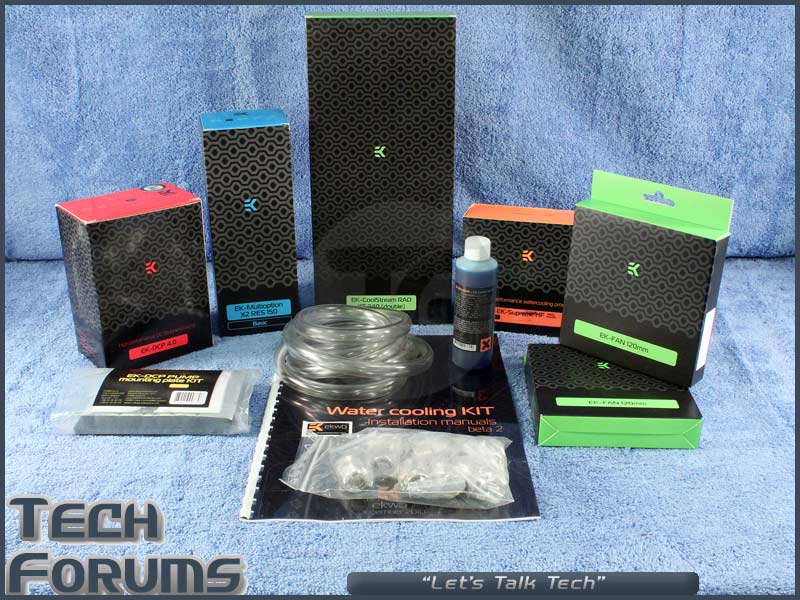
In the first two pictures we have the front and back of the box (14.5"x4.75"x9") while the third picture shows us the unpacked content.

Moving on to our next five pictures, we have the EK-Supreme HF waterblock. In the first picture we have the entire content of the waterblock packaging laid out. Included we have the waterblock, mounting hardware, Intel and AMD backplates, Arctic Cooling MX-2 (thermal paste), product manual and an Allen wrench for disassembly or maintenance. The second picture is a close-up of the acrylic top (55x55x6mm) of the waterblock. The G1/4" threaded hole on the left side is the intake (cold water supply) which will be connected to the radiator outlet. The G1/4" threaded hole on the right side, or outlet, will be connected to the reservoir intake. The third and fourth pictures are close-ups of the bottom of the waterblock. When the protective covering is removed we can see the block has an electrolytic copper base (59x59x12.6mm) with a mirror finish displaying my camera quite clearly. In the sixth picture we can see that the block is not perfectly flat, EK lists the base as lapped to +/-0.0007mm flatness. This is by design with the idea that the center of the cpu gets the hottest, so that is where the block will concentrate its contact. For the record, I'm just not sold on the convex design. For the purpose of this review I won't modify the waterblock, but don't be surprised if I lap it flat in the future.


EK-Supreme HF Installation Manual
EK-Supreme HF Specification Sheet
EK-Supreme HF Compatibility List
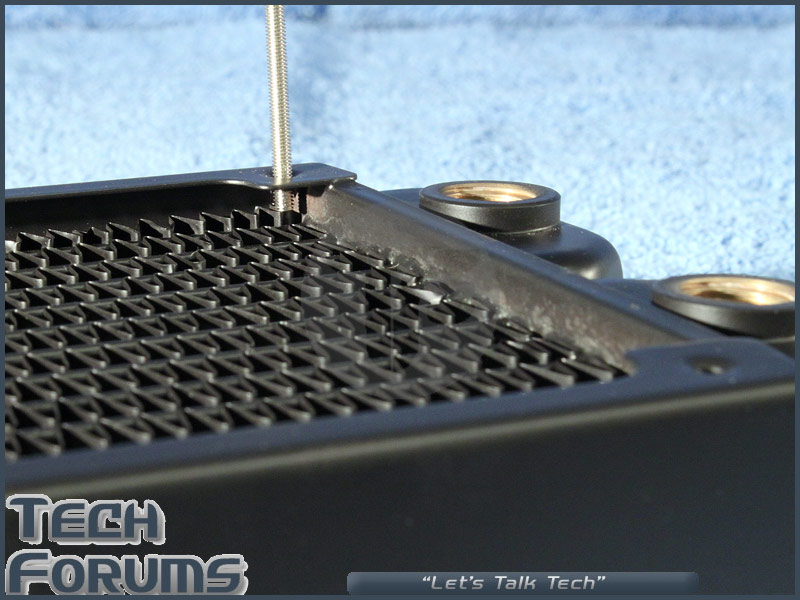
In our next set of three pictures we have the EK-CoolStream RAD XT (240) radiator. In the first picture we can see the whole radiator. Looking at the center of the picture, the copper fins attached to the parallel coolant channels are visible with a spacing of 10 to 11 fins per inch. The second picture shows us a close-up of one of the radiators dual brass chambers and its G1/4" threaded port hole. I took the third picture to illustrate the importance of using the correct length of screw when installing the fans. If the screw is to long it can damage the fins or even worse it can damage or puncture one of the coolant channels.


EK-CoolStream RAD XT (240) Installation Manual
EK-CoolStream RAD XT (240) Specifications
Up next we have a picture of the (2) Yate Loon D12SH-12 fans. These are 120x25mm 12v (0.3A) case fans rated at 88 cfm/40 dBA @ 2200 rpm by Yate Loon. EK is listing these fans at 77 cfm/36 dBA @ 2200 rpm. A quick check with my La Crosse Technology EA-3010U Anemometer and I calculated the cfm at 81 and 82. These fans have a standard 3-pin motherboard power connector.

Yate Loon D12SH-12 Specifications
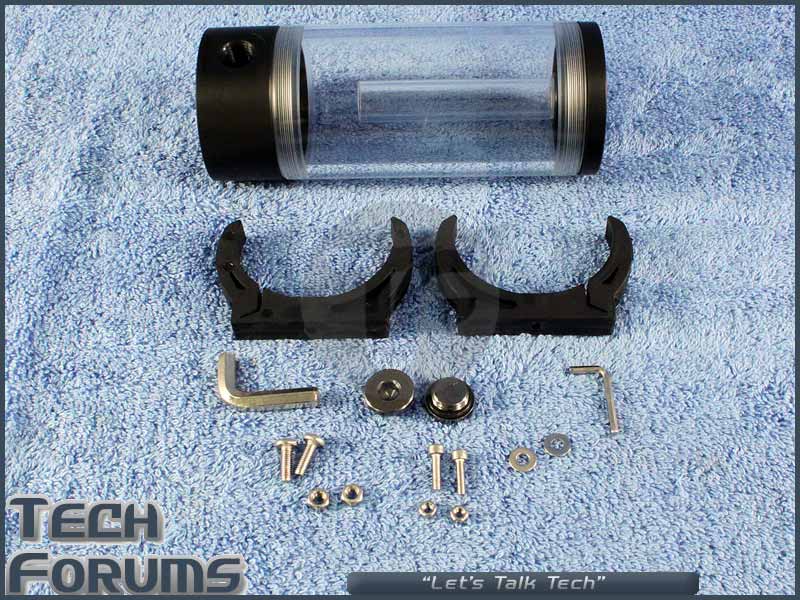
These next two pictures are of the EK-Multioption RES X2 - 150 Basic Reservoir, the EK-DCP 4.0 Pump, and the mounting plate. To be perfectly honest I had multiple people walk into my office right after I snapped this first photo of the reservoir and its hardware. I thought I had taken a few more shot of it but I didn't and I just skipped the pictures of the pump altogether and I started my assembly. I did take a few pictures of the assembly that show the other profiles of these items. The EK-Multioption RES X2 - 150 Basic Reservoir has a 60mm diameter and it is 150mm long with a capacity of 160 ml. One side of the reservoir has three G1/4" threaded inlet or outlet holes while the other side has a single G1/4" threaded inlet or outlet hole. Also included are two G1/4" plugs with a 6mm Allen wrench, and a set of reservoir holders with mounting screws and a 2.5mm Allen wrench. The EK-DCP 4.0 is a 12v, 1.8A, 18W pump capable of pumping 800 L/hr to a height of 4m. It has a life expectancy of 50000 hours at 25C and it has a noise level of 24.5dBA.

EK-Multioption RES X2 - 150 Basic Installation Manual
EK_DCP 4.0 (12V DC Pump) Installation Manual
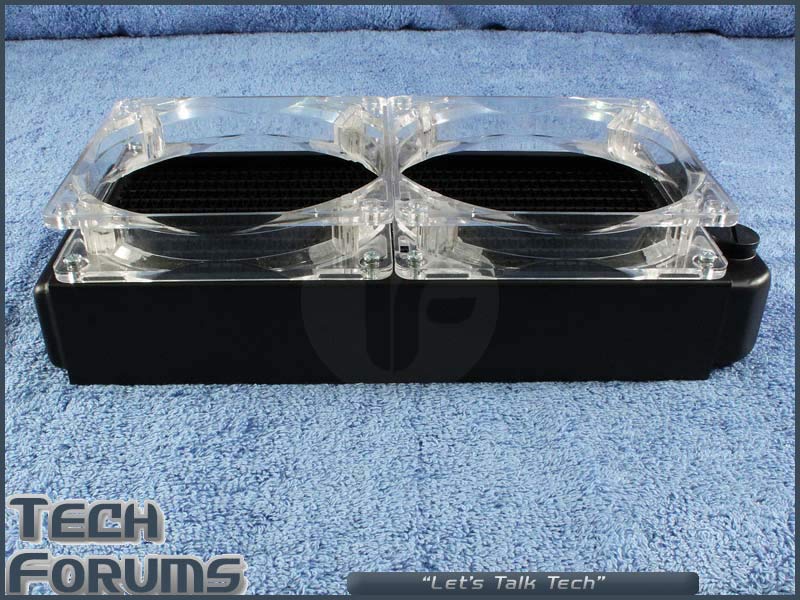
Before I actually started the assembly I made a couple of fan shrouds from some old case fans. Using my Dremel I cut the fan motors out, leaving just the exterior shell of the fan, then attached the shells to the radiator (1st picture). Some of you are probably wondering what is the purpose of these fan shrouds? Have you ever removed the fan from your heatsink and noticed that the dust layer is visibly thinner directly behind the center hub of the fan motor? Let's look at the second image I made using Autocad. On the left side we have the overhead view, the fan blades were omitted for illustration purposes. On the right side we have the side views with the general airflow illustrated. As the distance between the radiator and fan hub increases, the total area being cooled increases.

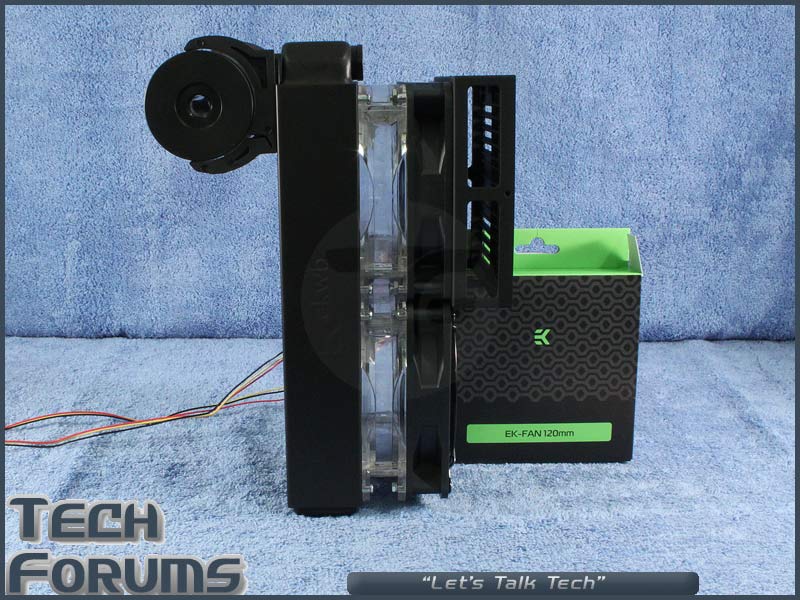
With the fan shrouds attached to the radiator I mounted the fans to the shrouds and the Swiftech Radbox fan housing to the top fan, first picture. The second picture has the contents of the RadBox displayed. The installation instructions are visible and fairly self explanitory but here is a link to the installation guide.


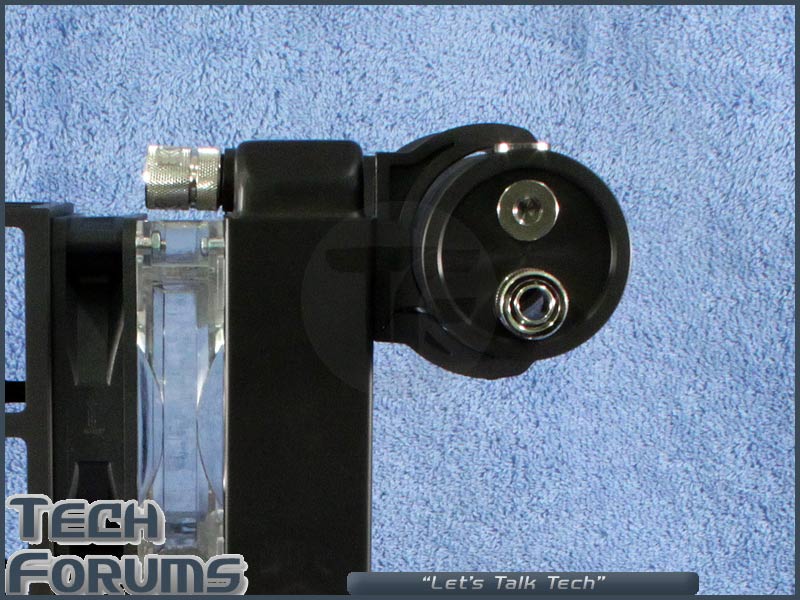
Continuing with our next set of three pictures, I've mounted the reservoir to the top of the radiator. The first picture is a little deceiving, as I could not get the radiator to stand up at a perfect 90-degree angle. It appears as though the plug on the top of the reservoir (this will be my fill-port) is much higher than the top of the radiator. In reality the plug and the top of the radiator are at virtually the same elevation. In the second picture we can see the side of the reservoir that has only one threaded G1/4" inlet/outlet. I will be using this as the reservoir's inlet, receiving the warm water directly from the EK-Supreme HF waterblock. The third picture shows the opposite side of the reservoir with its (2)-G1/4" threaded inlet/outlet ports. I have the top port plugged and the bottom port will be connected to the EK-DCP 4.0 12V pump inlet.

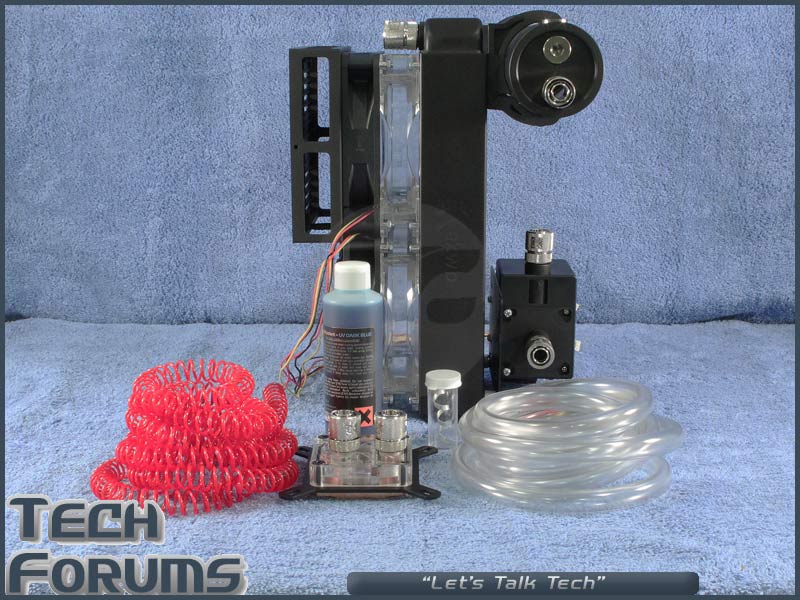
In the first two pictures below, we can see that I've mounted the pump to the bottom of the radiator and I've used a couple of spacers (purchased at my local hardware store) to facilitate better airflow. You never want to "dry-run" the pump; by locating the pump at the lowest possible elevation I'm using gravity to help ensure water is always available to the pump. The pump itself also generates some heat, so I'm also using the fan exhaust through the radiator to keep it cool. The third picture shows all the components that will be attached to the radiator attached and ready for the tubing. We can also see the red PrimoChill Anti-Kink Coils, the EK-Ekoolant UV Blue Additive, the IandH Silver Antimicrobial KillCoil, the Masterkleer 12.7/9.5 CLEAR tubing and the EK-Supreme HF waterblock.


In these next four pictures I have the tubing fitted and the whole assembly mounted to the back of my PC. I'll point out that I wasn't totally satisfied with the reservoirs mounting location so I went to the hardware store and bought a couple of "L" brackets that allowed me to raise its final elevation. If you look at the pictures closely you'll notice I've actually made a mistake, the tubing to the EK-Supreme HF waterblock is crossed.


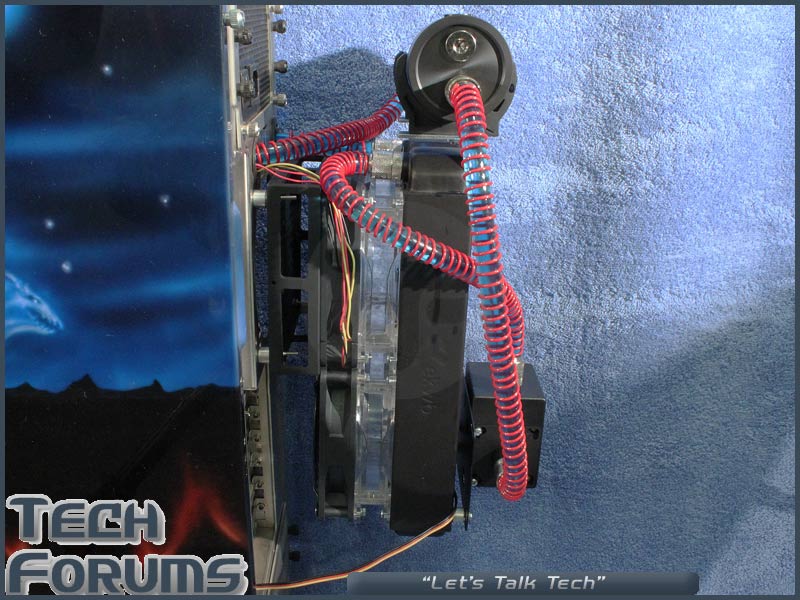
In my final two pictures we can see a close-up of the HK-Supreme HF waterblock installed with the tubing attached correctly, first picture. The second picture shows the addition of two more fans to test its maximum performance capabilities.


Test Setup
- Intel i7 2600K
- Asus P8P67 Deluxe B3 (bios ver. 1850)
- 8GB-(2x4GB) Corsair Vengeance 8-8-8-24-2T @ 1.5v
- (2)-EVGA GTX 480
- OCZ ZX Series 1250W Power Supply
- 120GB OCZ Agility3 SSD (OS)
- 120GB OCZ Agility SSD (Data)
- 250GB Seagate SATA II (Page and Temp files)
- Samsung 22X DVD Burner
- Asus 8X Blu-ray
- Lamptron Touch Fan Controller
- Lian-Li PC-A70B Full Tower Case
- Windows 7 Professional 64-bit
- Ai Overclock Tuner - Manual
- Turbo Ratio - By Per Core (Cannot Adjust in OS)
- 1-Core Ratio Limit - 50
- 2-Core Ratio Limit - 50
- 3-Core Ratio Limit - 50
- 4-Core Ratio Limit - 50
- Internal PLL Overvoltage - Enabled
- Memory Frequency - DDR3 1600MHz
- EPU Power Saving Mode - Disabled
- DRAM Timing Control - 8,8,8,24,1T
- Load-line Calibration - Ultra High
- VRM Frequency - Manual
- VRM Fixed Frequency Mode - 350
- Phase Control - Extreme
- Duty Control - Extreme
- CPU Voltage - Manual Mode
- CPU Manual Voltage - 1.465v
- Intel Adaptive Thermal Monitor - Disabled
- Enhanced Intel SpeedStep Technology - Disabled
- CPU C1E - Disabled
- CPU C3 Report - Disabled
- CPU C6 Report - Disabled
- LinX 0.6.4 with the All Memory Option selected
- Realtemp 3.67 (Excel logging enabled)
- Individual average of all 4 cores
- Delta T individual average of all 4 cores (core temp. minus the ambient temp.)
- Average of all 4 cores combined
Results
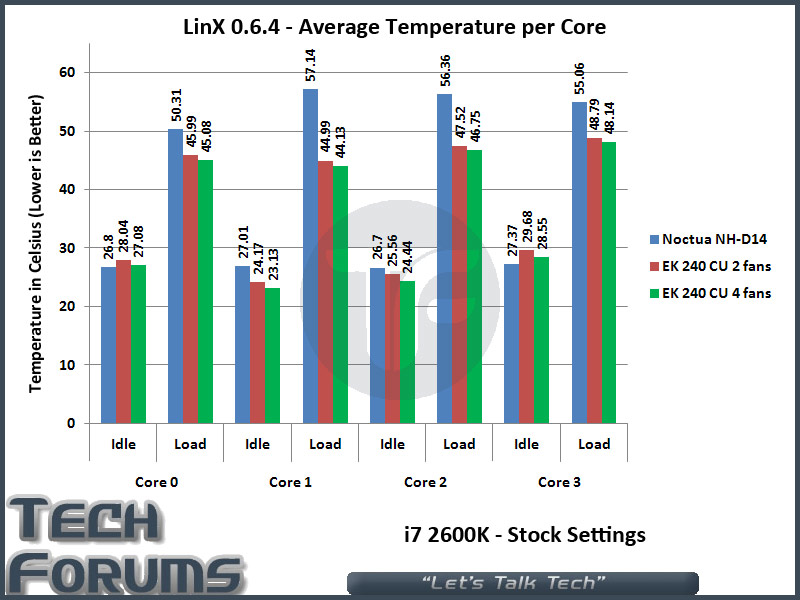
In the first two graphs below I have the results from the Stock Settings LinX runs. At default settings the Noctua NH-D14 has posted some outstanding results, with the idle temperatures in the mid 20C range and the load temperatures in the mid 50C range. The EK setup is dominating the temperature war (by 5C to 13C) but in reality, at stock speeds, this amount of cooling just isn't necessary. We can also see that adding two additional fans to the cooling loop results in a marginal improvement (1C at best). The Delta results are identical to the previous results, the only difference is the ambient temperature has been removed from the equation.

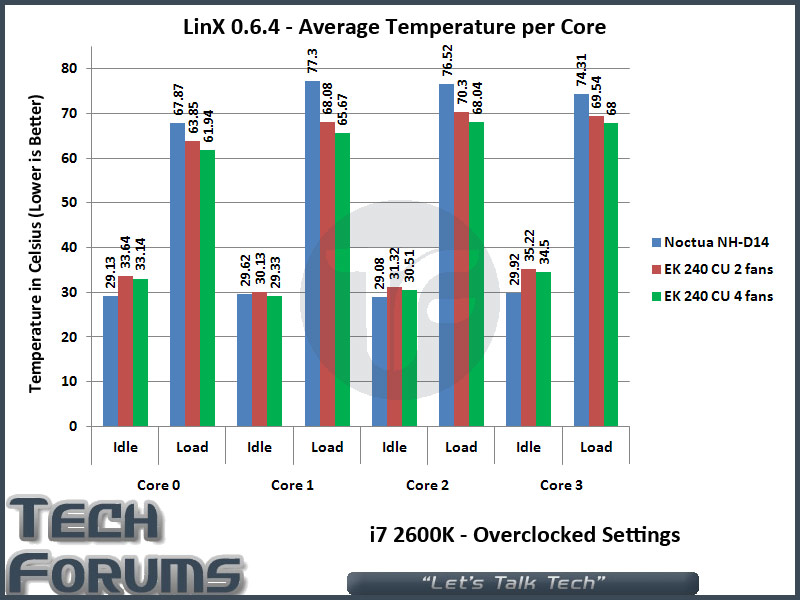
With the i7 2600K overclocked to 5GHz we can now see the need for the additional cooling. I was actually somewhat surprised that the Noctua had the lowest idle temperatures but that is really a non-issue in my opinion. What does matter is the load temperatures and the understanding that only one core has to overheat to cause trouble. With that in mind we can see the Noctua NH-D14 Core1 load has an average temperature of 77.3 Celsius. While this may sound acceptable it is an average and the core did exceed 80C numerous times in the testing period. The EK, two-fan setup, has an average core temperature of 70.3 Celsius on the hottest core (core 2). The maximum core temperature stayed in the low 70C range. When two additional fans were added to the loop we see the average core temperature stayed below 70C, excellent. Once again the DeltaT results are identical to the previous results with only the ambient temperature removed from the equation.

These final two graphs show us the overall average of all 4 cores combined. In my opinion these results show us nothing of importance, as an average of an average they are merely a basic indication of the true results.


Pro's
- Excellent Performance
- Multiple Mounting Locations
- Complete Kit for Basic Installation
- Cheaper than buying individual components
- Upgradeable
- Expensive compared to Air Cooling
- Advanced PC Knowledge Recommended
- Additional Hardware maybe required for Optional Mounting Locations
- Water is a potential Electrical Hazard
Overall I'm extremely happy with the EK-KIT H30 - Supreme HF 240 CU watercooling kit. While it is expensive compared to an air-cooled heatsink, it is actually priced economically for a custom waterloop. For the experienced user looking for an upgradeable, high-performance cooling alternative at a decent price, the EK-KIT H30 - Supreme HF 240 CU watercooling kit should be at the top of the list of candidates. I'm awarding the EK-KIT H30 - Supreme HF 240 CU watercooling kit 4 out of 5 Stars.

")